
So I've decided to stop beating myself up over not posting and here I am today with a recipe (but no photo, sorry!) for Honey Buns.
This is a KM first since I made up this recipe! I'm so excited that it worked and rose and not only that, but turned out soooo delicious! I used whole wheat flour, but you could use any mixture of whole wheat or white. Little M who is just starting to really put words into action said, "Mmmmm! Nom Nom Nom" when I gave him some, so it works for kids too.
Honey Buns
1 1/2 tsp active dry yeast (traditional)
2 tbsp honey
1 cup hot water
1/4 cup olive oil
Mix in a measuring cup and let sit until frothy. Mix if it isn't foaming.
2 1/2 cups (plus extra) whole wheat flour
1/2 tsp salt
1 sprig of rosemary (optional), finely chopped
Mix in a large bowl.
Add your yeast mixture and incorporate more flour as necessary to make a smooth dough, kneading all the while. Once you have a springy dough, cover it in about a tsp of olive oil then place it back in your bowl and cover with a tea towel. Place in oven with oven light on, or other warm, still place until doubled, about an hour.
Punch down and shape. (I made buns, but you could do whatever). I made 8 large-ish buns and put them in a glass 9 inch pie plate (greased with olive oil) to rise. Let rise until doubled, about an hour to an hour and a half.
Pre-heat oven to 350F, and bake for about 25-35 minutes, depending on the shape.
These came out of the pie plate easily after resting for a few minutes, so don't try to tip them out right away. If you were making loaves in normal bread pans, this would probably make about a loaf and a half, so either cut down the recipe, or double it if you want nicely risen loaves.
Friday, December 17, 2010
Thursday, September 2, 2010
Windy City Winnipeg Pie
A while ago I thought it might be a good idea to start eating "clean". I know, I'm a total follower, and not only that, I'm clearly behind on the movement. I bought a couple of magazines, but the meals were so much work! And so, I don't know, healthy? Which I understand is the point of clean eating, but I couldn't commit.
Well.
The other day my husband starts reading one of my old Clean Eating magazines and we start talking about meal planning (my nemesis). I decide to make a plan for the week's meals using some CE recipes. There on page 39 of the March/April 2010 issue was my new love. Windy City Pie.
It's not well known, but Winnipeg used to be known as the Chicago of the North. It was a major trading city before everything moved east. And it's windy as hell here in the winter. So while the Windy City in this recipe is supposed to be Chicago, I'm going to go ahead and swap in Winnipeg since that's where I live.
This is deep dish cheesy goodness in its most perfect form. I have rarely had pizza this thick and good, but not too gooey, crusty but not glued to the pan.
Of course I adapted the Windy City recipe, but the pizza dough was perfect as is.
CE's Whole Wheat Pizza Dough
Ingredients:
1 tbsp. honey
1 c. lukewarm water, divided
2.5 tsp active dry yeast (1 pkg)
2 1/2 c. whole wheat flour, divided
4 tsp. vital wheat gluten
1 tsp. salt
3 tbsp. olive oil, divided
Directions:
In a large bowl mix the honey and 1/3 c. water. Add yeast and allow to sit until foamy. (If after 10 minutes your mixture isn't foamy you've got dud yeast. Order takeout, then buy some new yeast.)
Mix 2 c. flour, the vital wheat gluten and the salt. Once the yeast is foamy, add the remaining water and 2 tbsp. of oil. Stir in the flour mixture until just combined. You'll have a very wet dough. Cover tightly with plastic wrap and let rise for an hour at room temperature. I put mine on top of the fridge since it's a bit warmer up there.
Turn out dough onto a floured surface and, adding flour if needed, knead for about 1 minute until smooth and no longer sticky. Place ball in bowl again, cover tightly and let rise another 30 minutes.
Transfer the dough back to your floured surface and knead for about 30 seconds. Divide into two balls using a sharp knife. Each ball is enough for one 12-14 inch pizza.
*To store the extra dough you can keep it tightly wrapped in the fridge for 24 hours, or freeze it (tightly wrapped) for up to a month.
Windah-Citah Winnipeg Pie
Ingredients:
8 oz. (about half a package) turkey sausage (I used smoked sausage)
2 tbsp. olive oil, divided
1 c. button mushrooms, sliced
1/2 medium zucchini, sliced
2 tbsp. cornmeal
8 oz. mozzarella cheese
4 tbsp. salsa or tomato sauce
Directions:
Preheat your oven to 425F.
Heat 1 tbsp. oil over medium high heat. Add mushrooms and zucchini and sauté until tender. Mushrooms will be slightly browned and zucchini skin should be bright green. Add salt and pepper to taste, then remove to a bowl to cool.
If you have turkey sausage that needs to be cooked, do so now. Remove casing, slice it thinly, then sauté.
I used a 10 inch stainless steel skillet for all prep and to cook my pizza. You could call this a one dish dinner too! Coat your skillet (or pan, whatever you're using for your pizza, but it should have high sides) with oil, then sprinkle with cornmeal.
Roll out your dough to about 12 inches around, then transfer to your skillet. Make sure you keep a deep edge around, about an inch and a half. Sprinkle about 1/3 of your cheese on the bottom, then layer your sausage and veggies. Spoon on your tomato sauce. I used thick salsa that I canned last year since it need to be used. Finally, layer on the rest of your cheese, making sure to get some on the crust too.


Place your skillet in the oven and bake for 30-35 minutes, depending on how crispy you like your crust. Remove from oven and let it sit for 5 minutes before slicing to allow filling to set.
(For the clean eaters, a serving is supposed to be 1/12 of the pizza. Good luck with that.)
This really only feeds two people. I know you're supposed to have side dishes and stuff, but really, it has veggies, meat, cheese and grains. It's a meal onto itself. Make two or even three if you have a family to feed.
I was so excited to eat this last night that I forgot to take a photo, but don't worry! I'll take a photo when I make it again tonight. Yes. It's that good.
ETA - I made this again tonight and it was delish again even though I used the original oven setting of 450F instead of the 425F that I used last night. The crust was a bit more browned than I'd like but really tasty. Tonight I used mushrooms and green peppers for the filling and I used a bit of Parmesan cheese along with the recommended amount of mozzarella.
If you have a 12-14 inch stainless steel skillet, USE IT! The pizza comes out like a dream.
I took plenty of photos tonight, but the laptop doesn't have a card reader, so they'll only be up tomorrow (Sept. 3). Sorry about that!
ETA #2 - Photos darling!


Tuesday, August 31, 2010
Tomato Basil Tart
This is one of my absolute favourite meals in the whole world. Yes, it's a bit hyperbolic, but it's soooo good, covers at least a couple of food groups and can be made with only a few ingredients.
I shamelessly stole this from Christine Ingram's Vegetarian and Vegetable Cooking.
Tomato and Basil Tart
Ingredients:
1 9-inch frozen pie shell
5 ounces fresh mozzarella, thinly sliced (about half a ball)
2 large tomatoes, thickly sliced
handful of basil leaves
olive oil
2 garlic cloves, thinly sliced
salt and pepper
Directions:
Preheat your oven to 400F and cook your pie shell for 10 minutes until just starting to turn golden. DO NOT OVERCOOK! Turn the oven down to 350F.
While your shell cools, slice everything. Now, with the garlic. Have you seen Goodfellas? Well if you haven't you should, but that's another discussion. Please see the photo below:
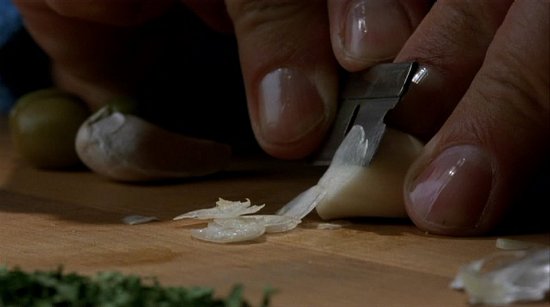
This is how thinly you should slice your garlic. It should be translucent, but not tearing. If you slice it too thin it will become crispy and burnt, if it's too thick it won't roast the way you want it to.
Okay, tangent aside.
Your crust is cool now, yes? Layer your mozza all around. Don't worry if you missed a couple spots, as the cheese melts it'll fill the crust. Then layer your tomatoes around. Then, dip your basil leaves and garlic in olive oil and place on the tomatoes. Drizzle a generous amount of olive oil on top, then grind some salt and pepper over top.
It should look like this:

Now, bake that sucker for 40-45 minutes until the tomatoes are dark red and fully cooked.
Of course, yesterday was pure kid-crazy-chaos and I forgot to take a photo of the final product. Sorry!
I shamelessly stole this from Christine Ingram's Vegetarian and Vegetable Cooking.
Tomato and Basil Tart
Ingredients:
1 9-inch frozen pie shell
5 ounces fresh mozzarella, thinly sliced (about half a ball)
2 large tomatoes, thickly sliced
handful of basil leaves
olive oil
2 garlic cloves, thinly sliced
salt and pepper
Directions:
Preheat your oven to 400F and cook your pie shell for 10 minutes until just starting to turn golden. DO NOT OVERCOOK! Turn the oven down to 350F.
While your shell cools, slice everything. Now, with the garlic. Have you seen Goodfellas? Well if you haven't you should, but that's another discussion. Please see the photo below:
This is how thinly you should slice your garlic. It should be translucent, but not tearing. If you slice it too thin it will become crispy and burnt, if it's too thick it won't roast the way you want it to.
Okay, tangent aside.
Your crust is cool now, yes? Layer your mozza all around. Don't worry if you missed a couple spots, as the cheese melts it'll fill the crust. Then layer your tomatoes around. Then, dip your basil leaves and garlic in olive oil and place on the tomatoes. Drizzle a generous amount of olive oil on top, then grind some salt and pepper over top.
It should look like this:

Now, bake that sucker for 40-45 minutes until the tomatoes are dark red and fully cooked.
Of course, yesterday was pure kid-crazy-chaos and I forgot to take a photo of the final product. Sorry!
Monster Cookies
So the other day my mom sends me this recipe from when I was a kid. Flashback! I'm not sure why they're called monster cookies, but I'd assume it's from Cookie Monster on Sesame Street. I think he's called something else now.
Like, Organic Whole Grain Spelt Flour Sugar Free High Fiber Biscuit Monster.
Or something.
What's even funnier is that I'm about to admit that I found the recipe still had too much sugar/butter for my kids so I adapted it! I know, I'm THAT parent.
If you want the original unfiltered recipe, post in the comments and I'll post it.
Monster Cookies
Ingredients:
2 c. peanut butter (I used the natural just peanuts stuff)
1 1/4 c. sugar
2 eggs
1 very ripe banana
3 c. quick oats
1 1/2 tsp. baking soda
1/4 tsp. salt
1/4 c. canola oil
1/2 c. raisins
1/4 c. unsweetened shredded coconut
Directions:
If you have a mixer, I'm going to make this very easy on you.
Dump and mix.
If you don't have a mixer, or would prefer to dirty more dishes, you can do it like this:
Blend peanut butter, sugar, eggs and banana. In a separate bowl stir together oats, baking soda, salt, raisins and coconut.
Slowly mix the dry ingredients into the peanut butter mixture. It will be wicked thick. While stirring, add the oil in a drizzle so that it loosens everything up.
Drop by teaspoonful, or shape into little balls, on baking sheets and bake at 350F for about 12-15 minutes.
NOM NOM NOM


Wednesday, August 4, 2010
Banana Coconut Muffins
I'll admit it. I'm on a health kick. After having baby numero dos in May, I've been eager to get back into shape. Even though I don't think that having three muffins for breakfast qualifies as a portion I explain it by pointing out that I NEED more food than before since I'm nursing. And I mean, it's whole wheat flour, that should count for something!
It has nothing at all to do with creamy coconut milk swirling around mashed bananas and oats. No. Not at all.
I made this recipe this morning for the first time, but it worked out so well I'm going to post it anyway.
Banana Coconut Muffins
Ingredients:
1 1/2 c. whole wheat flour
1 1/2 c. rolled oats
1/4 c. white sugar (Next time I might even take out the sugar all together.)
2 tsp. baking powder
1 tsp. baking soda
1/2 tsp. salt
1 egg
3/4 c. coconut milk
1/4 c. vegetable oil
1 1/4 c. puréed bananas (about 2-3)
Directions:
Mix all your dry ingredients in a large bowl. Beat up your egg, then add the rest of the wet ingredients.
Add the wet to the dry ingredients and stir until just combined.
Bake at 400F for 15 minutes for regular muffin tins, or 25 minutes for the larger muffins. Maxi-muffins if you will.
_____
Now. I'm a big fan of the creaming of the butter and the adding of the sugar, and all the best banana muffins I've ever had began with a butter base. But these. These trump all other banana muffins. They literally melt in your mouth, creamy but with little oat nuggets, and a slight coconutty tang. Super good.


I didn't get a great photo, but I'm not a great photographer. Hand me the mixer instead of the camera anyday!
These get a 4.5/5 from me!
Tuesday, July 20, 2010
Hamburgers & Buns
Since it's BBQ season here in the northern hemisphere, I figured it was past time to break out a hamburger recipe. I remember my mom making hamburgers as a kid, shaking and squeezing ingredients into a large bowl, deftly mixing everything, then shaping the patties with sure, swift movements, hands moving smoothly around and around. I make them the same way, though my patties always seem to have rough edges. I've received many compliments on my hamburgers and upon reflection and comparison with other recipes I think the secret ingredient is the ketchup. You totally need ketchup. In the patty, on the patty and as dip for the burger. One of my friends buys sugar free ketchup from the U.S., but I like the regular variety.
As for buns, I've tried out a new recipe today since I love those hamburger thins that you can buy. It wouldn't be The Cookery if I hadn't tweaked it, so I made some substitutions based on what I like. The President's Choice ones have a nutty chewy texture, so I added some oats to try to replicate that.
Hamburgers
Ingredients:
1 lb lean ground beef or bison
1 tbsp. ketchup
3-4 good squirts of Worcestershire sauce (though I was out. Damn! I used soya sauce instead)
1/4 - 1/2 c. bread crumbs (I was out again! I used oats instead)
1 tsp. oregano
1 1/2 tsp. basil
1/2 tsp. thyme
1 egg
Directions:
Dump everything in your mixer and stir until just combined. Using wet hands, take a handful at a time and shape into patties. This recipe should make 6-8 depending on how thick you want your burgers.
Cook or freeze individually, wrapped in parchment or wax paper.
Hamburger/Sandwich Thins (Whole grain)
Ingredients:
1 1/2 c. warm water
1/8 c. sugar
1 tbsp. yeast
1 egg
2 tsp. oil
2 1/2 c. whole wheat flour
3/4 c. quick cooking oats
1/4 c. lightly pulsed flax seed (to open up the seed)
2 tsp. whole flax seed
1 1/2 tbsp. vital wheat gluten
1 tsp. salt
Directions:
Mix water, yeast and sugar until dissolved. Add egg and oil and beat lightly.
In another bowl combine all the dry ingredients. Mix well then add half of the dry mixture to the wet. Let rise 30-45 minutes.
Once risen, add the remaining flour mixture and knead in your mixer for 5 minutes. I ended up having a screaming toddler situation, so it ended up being more like 10 for me. The dough will be very wet and sticky. Weigh it and divide by 16 (mine worked out to just about 2 ounces per bun).
Spread parchment paper on two cookie sheets. Watching your scale, and working with wet hands, shape one bun at a time. One recipe mentioned using a 4 inch biscuit cutter as a guide then smooshing the dough to fit, but I just slapped it on the cookie sheet and spread it around. The edges weren't as pretty, but it worked well.
Once you have all 16 rounds on your sheets, let rise for another 30-45 minutes. Preheat your oven to 350F, with the racks in the middle and bottom third positions.
Once risen, poke a few holes in each round using a wet straw or a wet chopstick. If you want fluffier buns, omit this step. Bake for 15-20 minutes until risen and golden brown.
Let cool on sheets. They'll seem really thin, but they're solid. Cut in half for buns.
And here's the final product! We had leftovers for another meal and it was just as good the second time. Yummah!

Wednesday, July 14, 2010
Whole Wheat Crackers
Awhile back I made Lavash Crackers and they were great, but I forgot to write a post. When I came to crackers again, I decided to try a different recipe, just for kicks.
Whole Wheat Crackers
Ingredients:
2 c. water
1/2 tsp. active dry yeast
2 c. whole wheat flour (I used Graham Wheat Flour)
1 1/2 tsp. salt
2 tbsp. olive oil
2-3 c. all purpose flour
Any kind of seeds, nuts, cheese, seasonings you want for the topping
Directions:
Dissolve yeast in warm water. Stir in whole wheat flour a cup at a time to make a smooth thick batter. Add salt and oil, stirring well after each addition. Add 1 1/2 cups of the all purpose flour and then turn out onto a floured surface to knead for 5 minutes. I needed the extra flour, so don't be scared to add the extra 1 1/2 cups of flour. Depending on the type of whole wheat flour you use, you may not need as much. Once the dough is smooth and firm and no longer sticky, put aside in a lightly oiled bowl and cover with plastic wrap. Let rise for 2.5 hours.
Pre-heat oven to 450F. Line two baking sheets with parchment paper. Fill a spray bottle with water.
Cut the dough in half and then into 4 equal pieces. Work with one piece at a time, keeping the others well covered. Roll out dough to fit in the baking sheet. It will be springy, so if it needs a couple of minutes, let it rest while you roll out a second sheet. You'll be baking two at a time anyway. Spritz with water, then add toppings, pressing gently into the dough. Prick well with a fork, then cut into whatever shapes you want. A pizza cutter works best.
Bake two sheets at a time for 6-8 minutes depending on the thickness of the dough. Your pieces should be golden brown and crispy on the bottom.
Repeat with the rest of the dough.
Cool completely and keep in an airtight container. They'll keep for about a week, but they'll be gone long before then!

I used caraway seeds, poppy seeds, sesame seeds, pumpkin seeds and sunflower seeds as toppings. I added a sprinkle of salt to each batch as well.
Whole Wheat Crackers
Ingredients:
2 c. water
1/2 tsp. active dry yeast
2 c. whole wheat flour (I used Graham Wheat Flour)
1 1/2 tsp. salt
2 tbsp. olive oil
2-3 c. all purpose flour
Any kind of seeds, nuts, cheese, seasonings you want for the topping
Directions:
Dissolve yeast in warm water. Stir in whole wheat flour a cup at a time to make a smooth thick batter. Add salt and oil, stirring well after each addition. Add 1 1/2 cups of the all purpose flour and then turn out onto a floured surface to knead for 5 minutes. I needed the extra flour, so don't be scared to add the extra 1 1/2 cups of flour. Depending on the type of whole wheat flour you use, you may not need as much. Once the dough is smooth and firm and no longer sticky, put aside in a lightly oiled bowl and cover with plastic wrap. Let rise for 2.5 hours.
Pre-heat oven to 450F. Line two baking sheets with parchment paper. Fill a spray bottle with water.
Cut the dough in half and then into 4 equal pieces. Work with one piece at a time, keeping the others well covered. Roll out dough to fit in the baking sheet. It will be springy, so if it needs a couple of minutes, let it rest while you roll out a second sheet. You'll be baking two at a time anyway. Spritz with water, then add toppings, pressing gently into the dough. Prick well with a fork, then cut into whatever shapes you want. A pizza cutter works best.
Bake two sheets at a time for 6-8 minutes depending on the thickness of the dough. Your pieces should be golden brown and crispy on the bottom.
Repeat with the rest of the dough.
Cool completely and keep in an airtight container. They'll keep for about a week, but they'll be gone long before then!
I used caraway seeds, poppy seeds, sesame seeds, pumpkin seeds and sunflower seeds as toppings. I added a sprinkle of salt to each batch as well.
Granola Chews
I make these all the time, at least every month or so. You can eat two or three as a snack and feel like you've actually eaten something. They give you energy and they're the perfect sweetness. The best part is that you can endlessly change the ingredients based on what you have on hand. You also don't really need to measure, which always gets points from me. Lately I've been using a 500g (2 cup) jar of natural peanut butter. I use my mixer to incorporate the oil because I'm d.o.n.e. trying to mix in the oil with a butter knife. If anyone has figured out a trick to mix it without getting the oil all down the side of the jar, then on the counter, then on the tap as you try to clean it off, kudos to you. I just say to hell with it, and dump it all in my mixer and beat it until smooth.
I've found that the best peanut butter to use with these is the Kraft All Natural peanut butter. If you use sugar added peanut butter you'll be left with puddles of peanut butter at the bottom of your muffin tins.
Granola Chews
Ingredients:
1 c. natural peanut butter
1/2 c. maple syrup OR corn syrup OR honey etc.
4 eggs
2 tsp. seasoning (cinnamon, nutmeg, cloves, pumpkin pie spice, whatever you want)
5 c. granola type cereal (I've had great success with Kashi granola, Go Lean and Go Lean Crunch. Just regular no name almond-raisin granola works well, though it's a bit sweet)
1 1/2 c. cranberries, or any dried fruit cut into bite sized pieces (you can sub part of this portion for seeds or nuts too)
Directions:
Dump everything into your mixer and stir until combined.
Portion out into 24 muffin cups. Bake at 250F for 45 minutes. When you take them out they should be just a bit cake-y when you bite into one. Yes, that means that as an official part of this recipe, you must take a bite upon completion. You're welcome.

Yeah, it's that easy. And good for you. And delicious. I'm telling you, make it happen. These freeze really well too, so I have a bunch in the freezer for those times that I haven't had time to make them fresh.
Oatmeal Blueberry Muffins
So we're going away for the weekend and I've been packing and baking all week in preparation. We're talking about an 8 hour drive with two children under 18 months. One of whom is a human garbage disposal. I've been scouring the internet for easy, child friendly things to make but I haven't really had a lot of luck.
I needed quick, easy to grab and eat snacks. I didn't want super sticky fingers and since the little man was eating them, I wanted at least a modicum of healthiness. Sure my husband and I can eat chips and chocolate on the road, but feeding a toddler sugar and then strapping him into a carseat? Kill. Me. Now. Given those criteria, this is what I've decided to bring:
hard-boiled eggs
these delish muffins
dried mango and apricots
prepared pb&j sandwiches in manageable pieces (made with Mango-Almond Whole Wheat Bread)
bite-sized cereal (Organic Cinnamon Harvest - like Shredded Wheat, but better)
baking powder biscuits
Granola Chews
Crackers
I'll probably make a bean dip to go with the crackers, though there's a bar of cream cheese in the fridge that's calling my name.
As for those muffins...
Oatmeal Blueberry Muffins
Ingredients:
1 c. whole wheat flour
1 1/2 c. oats (quick or slow, doesn't matter)
1/2 c. sugar (you could probably reduce this to 1/3 if you wanted)
1 tbsp. baking powder
3/4 c. blueberries
Stir to combine. Add blueberries and coat with mixture. Set aside.
1 egg
1 c. milk
2 tbsp. vegetable oil
Stir. Add dry ingredients and stir until just combined.
OPTIONAL: Topping. I used the extra bits at the bottom of little man's box of cereal for a crunchy topping. It's sweet and a bit of extra fiber. These muffins don't really need it though, so it's up to you.
Bake at 400F for 30 minutes for the extra large muffins (6 per tin), or 20 minutes for regular muffin tins.


Get up a bit early and make them for breakfast on a weekend, they're wicked good right out of the oven with a hot cup of coffee.
Monday, July 5, 2010
Mango Almond Whole Wheat Bread
Don't worry, it's not all baked goodies forever and ever, but I haven't had time yet to go grocery shopping so my meal ideas are still just ideas.
I've been buying mangoes by the dozen, meaning to freeze them so I can enjoy the sweet-sour taste during a January blizzard, but they're so good I keep eating them fresh. I have a noodle recipe for later on with mangoes, but of course it wouldn't be The Cookery if I didn't try to make a mango type bread.
This one uses dried mangoes. Try to make sure you get the sugar free dried mango, no one really needs all that sugar, as delicious as it is. I accidentally bought the sweetened slices, so that's what I ended up using.
Now, full disclosure, I'm not a huge fan of whole wheat bread. It's dry and heavy and usually tastes like cardboard. Well not this one! The dried fruit melts during baking and keeps the bread moist while spreading the flavour around. In the end you have a nice crisp outside with a beautiful fluffy moist interior.
Mango Almond Bread
2 very large loaves (3 regular sized ones)
Ingredients:
5 c. warm water
2 tsp. active dry yeast
6 1/2 c. whole wheat flour
1/4 c. vital wheat gluten*
1/2 c. light brown sugar
scant 2 tbsp. salt
3-4 c. all purpose flour
1 1/4 c. dried mango strips, cut into bite sized pieces
1 c. whole almonds
Directions:
Add yeast to water in a large bowl and stir to dissolve completely. Add the whole wheat flour, 2 cups at a time, until you have a smooth batter. Cover and set aside for an hour, it'll be wicked bubbly and risen.
Sprinkle the brown sugar and the salt on top, then stir to combine. Add the remaining flour a 1/2 cup at a time, stirring and beginning to knead as it comes together. Turn out dough on to a floured surface, adding flour as necessary to prevent sticking, and knead 10 minutes. I just used my dough hook for 5 minutes on speed 2. Your dough should be smooth and elastic. Cut your dough in half, putting each half in a lightly oiled bowl to rise for another hour.
Press each dough into a rectangle and sprinkle on half the mango and half the almonds. Shape dough into loaves (poke in any escapee mangoes or almonds) and place into 2 buttered bread pans (9x5"). Leave to rise 30 minutes while you preheat the oven to 400F.
Just prior to putting the bread in the oven, make three diagonal slashes across the top. Bake for 50-60 minutes, or until golden. The bread is done when it sounds hollow when tapped on the bottom and the corners are firm when pinched. (Why does that sound dirty?) Remove from pans immediately and place on racks to cool. Let rest at least a half hour before digging in.
*
Vital Wheat Gluten helps the bread rise by creating more strands of gluten; it's especially important in breads with a lot of whole wheat flour like this one. I buy the Bob's Red Mill brand. The directions recommend using 1 tbsp. for every cup of whole wheat flour, though in this recipe only 4 tbsp. are used and that's plenty.


I just had a slice toasted with cream cheese and it was super delicious. The mango gives just a bit of tang. In the future I think I'll stick to sliced or slivered almonds, or maybe even pumpkin seeds since my kid had issues with the whole almonds. It's hardly the point to bake this beautiful bread only to have to rip it apart to find and remove the almonds since they may induce a choking fit. The other issue with this bread is that I wouldn't want to make a sandwich with it; it would be too many competing flavours.
This bread would be perfect for breakfast, or sliced for company, or even as buns with a special (or not so special) supper.
I've been buying mangoes by the dozen, meaning to freeze them so I can enjoy the sweet-sour taste during a January blizzard, but they're so good I keep eating them fresh. I have a noodle recipe for later on with mangoes, but of course it wouldn't be The Cookery if I didn't try to make a mango type bread.
This one uses dried mangoes. Try to make sure you get the sugar free dried mango, no one really needs all that sugar, as delicious as it is. I accidentally bought the sweetened slices, so that's what I ended up using.
Now, full disclosure, I'm not a huge fan of whole wheat bread. It's dry and heavy and usually tastes like cardboard. Well not this one! The dried fruit melts during baking and keeps the bread moist while spreading the flavour around. In the end you have a nice crisp outside with a beautiful fluffy moist interior.
Mango Almond Bread
2 very large loaves (3 regular sized ones)
Ingredients:
5 c. warm water
2 tsp. active dry yeast
6 1/2 c. whole wheat flour
1/4 c. vital wheat gluten*
1/2 c. light brown sugar
scant 2 tbsp. salt
3-4 c. all purpose flour
1 1/4 c. dried mango strips, cut into bite sized pieces
1 c. whole almonds
Directions:
Add yeast to water in a large bowl and stir to dissolve completely. Add the whole wheat flour, 2 cups at a time, until you have a smooth batter. Cover and set aside for an hour, it'll be wicked bubbly and risen.
Sprinkle the brown sugar and the salt on top, then stir to combine. Add the remaining flour a 1/2 cup at a time, stirring and beginning to knead as it comes together. Turn out dough on to a floured surface, adding flour as necessary to prevent sticking, and knead 10 minutes. I just used my dough hook for 5 minutes on speed 2. Your dough should be smooth and elastic. Cut your dough in half, putting each half in a lightly oiled bowl to rise for another hour.
Press each dough into a rectangle and sprinkle on half the mango and half the almonds. Shape dough into loaves (poke in any escapee mangoes or almonds) and place into 2 buttered bread pans (9x5"). Leave to rise 30 minutes while you preheat the oven to 400F.
Just prior to putting the bread in the oven, make three diagonal slashes across the top. Bake for 50-60 minutes, or until golden. The bread is done when it sounds hollow when tapped on the bottom and the corners are firm when pinched. (Why does that sound dirty?) Remove from pans immediately and place on racks to cool. Let rest at least a half hour before digging in.
*

Vital Wheat Gluten helps the bread rise by creating more strands of gluten; it's especially important in breads with a lot of whole wheat flour like this one. I buy the Bob's Red Mill brand. The directions recommend using 1 tbsp. for every cup of whole wheat flour, though in this recipe only 4 tbsp. are used and that's plenty.


I just had a slice toasted with cream cheese and it was super delicious. The mango gives just a bit of tang. In the future I think I'll stick to sliced or slivered almonds, or maybe even pumpkin seeds since my kid had issues with the whole almonds. It's hardly the point to bake this beautiful bread only to have to rip it apart to find and remove the almonds since they may induce a choking fit. The other issue with this bread is that I wouldn't want to make a sandwich with it; it would be too many competing flavours.
This bread would be perfect for breakfast, or sliced for company, or even as buns with a special (or not so special) supper.
Saturday, July 3, 2010
Triple Layer Cake
So, that carrot cake that I was talking about? It's the middle layer in this three layer cake that I made for my parents' visit. I've adapted these recipes from the originals, and the ginger cake one is a special version all my own. The ginger cake idea came from my husband. When I asked him what kind of cake he wanted for his birthday his only criterion was "different". I got to thinking and came up with ginger cake. There are a ton of recipes for this on the internet and a google search turned up a few that sounded really promising. Each one was missing something though, so I made a mash up recipe and it was tasty, but a bit dry I thought. The ginger cake layer in this recipe is a bit different because I lost the first measurements that I used. I made sure to write it down in a place I'd remember this time.
The carrot cake adapted from a Jamie Oliver recipe in his "Cook" book. I made it exactly to specifications the first time, but it wasn't quite what I wanted, so this time I tweaked it a bit. Moist and tender, this cake is worth every second spent grating carrots. Or you can be like me and use your Kitchen Aid. I'm telling you: Buy one! It's worth every penny.
The chocolate cake is a stand-by recipe that turns out every time. It's a nice dense chocolatey cake.
I made this cake over the course of a week. I would freeze each layer after it's fully cooled to make sure it remains fresh. If you were feeling ambitious, I'm sure you could do it all in one day!
Triple Layer Cake
Top Layer: Ginger Cake
This recipe makes a 9" cake as well as two decent sized loaves
Ingredients:
1 block unsalted butter, softened
2 c. light brown sugar
6 eggs
4 c. flour
2 tbsp. ground ginger
1 tbsp. grated fresh ginger
1/2 tsp. cloves
1 tbsp. nutmeg
1 tsp. salt
1 c. molasses
2/3 c. milk
Directions:
Cream butter and sugar, adding the sugar slowly until the mixture is light and fluffy. Add the eggs one at a time, beating well after each addition.
Stir together the dry ingredients, including spices. (You'll note this recipe doesn't have any leavener. You can add 1 tbsp. baking powder if you want.)
Mix the molasses and the milk.
Add the dry and wet ingredients to the butter mixture, alternating dry and wet. Beat well after every addition. Your batter should be smooth and creamy, a light brown caramel colour.
Bake at 350F. The cake takes about 35-40 minutes and the loaves take about 50-55 minutes. Cool in pan for 10 minutes then turn onto wire rack to cool completely.
Be aware that you're going to want to eat at least one of the loaves that night. I would have either strong coffee or beer on hand to pair with the cake. If you find this too sweet, I think you could reduce the sugar to 1 cup and still have a really nice cake.
Carrot Cake
Makes 1 loaf, or 2 8" pans
Ingredients:
1 1/4 c. unsalted butter, softened
1 c. light brown sugar
5 eggs, separated
zest and juice of one orange
1 1/2 c. flour
1 heaping tsp. baking powder
1/2 tsp. baking soda
1 heaping tsp. cinnamon
pinch of cloves
pinch of nutmeg
1/2 tsp. ground ginger
10 ounces carrots, peeled and grated (about 2-3 carrots)
Directions:
Separate the eggs and allow to come to room temperature.
Cream butter and sugar, adding the sugar slowly until the mixture is light and fluffy. Add the eggs yolks one at a time, beating well after each addition. Add the orange juice and zest and stir.
Stir together the flour, baking powder and baking soda. Add to the butter mixture, then add the spices and grated carrots. Mix well.
Whisk the egg whites with a pinch of salt until stiff, then fold into the batter. Spoon batter into pans.
Bake at 350F for 50-55 minutes. Cool in pan for 10 minutes then turn onto wire rack to cool completely.
This cake is moist and chewy, kind of like a really good banana bread. Actually adding a banana instead of a couple of egg yolks would probably yield something delicious. Hmm, maybe I'll try that next.
Chocolate Cake
Makes 2 9" pans
Ingredients:
3/4 c. unsalted butter, softened
3 eggs
2 c. flour
3/4 c. unsweetened cocoa powder
1 tsp. baking soda
3/4 tsp. baking powder
1/2 tsp. salt
2 c. sugar
1 1/2 c. milk
Directions:
Allow eggs to come to room temperature.
Cream butter and sugar, adding the sugar slowly until the mixture is light and fluffy. Add the eggs one at a time, beating well after each addition.
Stir together the flour, baking powder, baking soda and salt. Add the dry mixture and the milk to the batter, alternating dry and wet. Stir until just combined after each addition, scraping down the side of the bowl when necessary.
Spread into pans and bake at 350F for 30-35 minutes. Cool in pan for 10 minutes then turn onto wire rack to cool completely.
I used cream cheese frosting to ice the cake. I thought it was a great match but my husband wasn't crazy about the chocolate with the cream cheese. I notice that didn't inhibit him from inhaling said cake though.
Alright people, it's drool time. I know, I know. I need to work on my icing skillz.


Monday, June 14, 2010
Suzanne's Flax Bread
There are so many different types of bread out there and this recipe is a sure-fire success. It's now a stand-by in my kitchen since it's so easily adaptable and convenient. The dough rises either overnight or all day, making it perfect to fit into any schedule. I usually make the dough in the morning and bake it at night since by the time evening comes and the kids are asleep I'm ready to go to sleep myself. I used to do all this baking/cooking during Mister M's nap times, but now having two children, I find that I have to be willing to do everything while he's awake since otherwise I'd never get anything done. He's been fascinated by the mixer for a while (he has my old littler one to play with, unplugged of course), so now we do my baking together. It takes longer, but resolves the whining-child-at-my-feet issue I was having.
My sister came out to visit when I had the new baby and she loved this bread so I'm re-naming it for her.
Suzanne's Flax Bread
Makes 4 loaves
Ingredients:
4 c. warm water
1/2 tbsp. traditional yeast
2 c. milk (I use homo)
3 c. whole wheat flour
2 tbsp. honey
10-12 c. all purpose flour
2 tbsp. salt
2 tbsp. olive oil
1 c. ground flax seed
Directions:
Mix water and yeast. Stir to dissolve, then add milk. Stir in the whole wheat flour, it'll be quite lumpy, but don't worry about it. Add your honey and stir, then add about 4 cups of the all purpose flour and mix until it becomes a smooth batter.
Add the salt and oil, mixing after each addition. Add the flax seed and another 4-5 cups of flour. Knead, adding flour as necessary, until you have a smooth and elastic dough. I've done this both by hand and in my mixer, it works well either way.
Place in a large lightly oiled bowl to rise. During the summer I let it rise on top of my fridge, but in the frigid Canadian winter I put it in the oven and leave the oven light on for some warmth. Let rise overnight or 8-12 hours, whatever is most convenient.
Punch down dough. Turn out onto a floured surface and using a pastry scraper or a sharp knife cut the dough into four pieces. Working with one piece at a time, leaving the others covered with a towel, shape dough into a loaf and place it in your pan. Leave to rise 40 minutes.
Preheat oven to 400F. Bake loaves for 10 minutes, then turn down temperature to 375F without opening the door. Bake for 20 minutes, then rotate pans and bake for another 20 minutes. Loaves should sound hollow when tapped on the bottom.
Brush tops with margarine, but wait until mostly cooled to slice.
This makes great toast because it's nice and dense without being too heavy. No huge airpockets for your peanut butter to melt into. Sorry I don't have a photo, I'll take one next time!
ETA: Found a photo of the dough before I put it aside to rise.

Friday, June 4, 2010
After an extended absence I give you: Amazingness in a muffin tin!
Apologies for the extended absence. I do, however, have some great news to make up for it. I have a new baby!! That's right, I upgraded to the 6 qt KitchenAid mixer!! I am ridiculously excited about it. It arrived on my birthday of all days, though it hadn't been planned that way, and was the best gift to myself ever. Totally worth giving up the shoes I had promised to myself for my 30th birthday.
Hello beautiful.

Speaking of hello beautiful, I also gave birth to a baby. Another reason for the absence. I got to use my mixer to make a dense, moist carrot cake a few days after the birth and it was heavenly. Totally worth it. I'll have that recipe in a few days.
Today though I'm starting with an adaptation of Banana-Coconut Bread for Pam from the Home Baking cookbook (the original is also delicious!). I like to call it Amazingness in a Muffin Tin.
Ingredients:
4 medium over-ripe bananas
2 c. all-purpose flour
3/4 tsp. baking soda
1/2 tsp. ground nutmeg
1/2 tsp. cloves
2 1/2 tbsp. cocoa
1/2 c. butter, softened
1/2 c. light brown sugar
1/2 c. white sugar
1/8 tsp. apple cider vinegar
1 1/2 tbsp. spiced rum
1/2 c. shredded unsweetened coconut
1/2 c. chocolate chips
Directions:
Preheat oven to 350F.
Puree the bananas. You should have about one and a half to two cups of puree. Set aside.
Sift the flour, baking soda, nutmeg, cloves, and cocoa. Set aside.
Cream the butter and sugar until light and fluffy. Add the vinegar and the rum and beat briefly. Add the banana and flour mixture alternately about 1 cup at a time, beginning with bananas. Beat until smooth after every addition. Stir in the coconut and the chocolate chips.
Spoon the batter generously into muffin tins. Bake for about 20-25 minutes or until set.
Makes 12-16 depending on how big you like your muffins.

You know the only thing that could really make this recipe better? Peanut butter. I'll have to figure out a way to incorporate peanut butter. Try it though, you won't regret it!
Hello beautiful.
Speaking of hello beautiful, I also gave birth to a baby. Another reason for the absence. I got to use my mixer to make a dense, moist carrot cake a few days after the birth and it was heavenly. Totally worth it. I'll have that recipe in a few days.
Today though I'm starting with an adaptation of Banana-Coconut Bread for Pam from the Home Baking cookbook (the original is also delicious!). I like to call it Amazingness in a Muffin Tin.
Ingredients:
4 medium over-ripe bananas
2 c. all-purpose flour
3/4 tsp. baking soda
1/2 tsp. ground nutmeg
1/2 tsp. cloves
2 1/2 tbsp. cocoa
1/2 c. butter, softened
1/2 c. light brown sugar
1/2 c. white sugar
1/8 tsp. apple cider vinegar
1 1/2 tbsp. spiced rum
1/2 c. shredded unsweetened coconut
1/2 c. chocolate chips
Directions:
Preheat oven to 350F.
Puree the bananas. You should have about one and a half to two cups of puree. Set aside.
Sift the flour, baking soda, nutmeg, cloves, and cocoa. Set aside.
Cream the butter and sugar until light and fluffy. Add the vinegar and the rum and beat briefly. Add the banana and flour mixture alternately about 1 cup at a time, beginning with bananas. Beat until smooth after every addition. Stir in the coconut and the chocolate chips.
Spoon the batter generously into muffin tins. Bake for about 20-25 minutes or until set.
Makes 12-16 depending on how big you like your muffins.

You know the only thing that could really make this recipe better? Peanut butter. I'll have to figure out a way to incorporate peanut butter. Try it though, you won't regret it!
Wednesday, February 17, 2010
Grown-Up Grilled Cheese
Now THIS is what I call a grilled cheese sandwich with everything you could want. If you haven't yet, you need to find the February issue of Bon Appetit. I bought it because the sandwich looked so good I began to (silently) blubber at the magazine rack.
Forewarning - This can take all day. But you should do it. Because the results are farking divine. You don't even have to take this with a grain of salt, you know why? Because I don't even really LIKE beef. In fact, I haven't eaten cow other than ground beef (which isn't even really like beef to me, it's like the original veggie ground round), in years. I avoid it because it's stringy and there's fat and I hate having to deal with the animalness of big cuts of beef. So I started small. You're totally supposed to use short-ribs, but they had the unfortunate drawback of having bones. Since I don't like bones I used some pre-cut shoulder steak instead. Nice little strips, very little fat and no bones!
You should check out the original recipe if only to drool over the photo. But my version was a bit different so I'll just post what I actually did.
To make it a real treat, serve with fries.


We had this on Friday night and it was perfect with a bit of the leftover wine. I'm really looking forward to making this again, though I think next time I'll try the actual short-ribs from the original recipe. I need a cast iron dutch oven though. I've been looking through the Pioneer Woman website and several ladies have mentioned that her shortribs are delicious, but I really want one of those 5L dutch ovens. I notice that she has a Le Creuset, but it's a little out of our price range right now, so we were looking at the KitchenAid one. Unfortunately a few people have complained about the quality, leaving us to save up for the one I really want.

Almost makes me drool as much as this sandwich. Almost.
Forewarning - This can take all day. But you should do it. Because the results are farking divine. You don't even have to take this with a grain of salt, you know why? Because I don't even really LIKE beef. In fact, I haven't eaten cow other than ground beef (which isn't even really like beef to me, it's like the original veggie ground round), in years. I avoid it because it's stringy and there's fat and I hate having to deal with the animalness of big cuts of beef. So I started small. You're totally supposed to use short-ribs, but they had the unfortunate drawback of having bones. Since I don't like bones I used some pre-cut shoulder steak instead. Nice little strips, very little fat and no bones!
You should check out the original recipe if only to drool over the photo. But my version was a bit different so I'll just post what I actually did.
Grilled Cheese and Steak Sandwich - KM Styles
Ingredients:
STEAK
1 pkg. shoulder steak strips
1.5 tbsp margarine
1.5 tbsp olive oil
1 celery stalk, chopped
1 large carrot, chopped
1 small onion, chopped
3/4 cup dry red wine (I used a Merlot, yum!)
1/4 cup broth (I used chicken broth)
3 tbsp medium-dry Sherry
1 garlic clove, peeled
1 bay leaf
PICKLED CARAMELIZED ONIONS
1 tablespoon olive oil
1 large white onion, sliced
2 tablespoons white wine vinegar
1 teaspoon sugar
ASSEMBLY
8 slices of fresh bread, or 8 french rolls
some sliced sharp or old cheddar cheese
1/4 head of romaine lettuce
Directions:
STEAK
Mis en Place
Sprinkle beef with salt and pepper.
Heat margarine and olive oil in large skillet over medium-high heat. Cook beef until just browned.
Transfer to a baking sheet or bowl. Add celery, carrots, and onion to pot and sauté until beginning to soften and brown, stirring often, about 5 minutes.
Add wine, broth, Sherry, garlic, and bay leaf; bring to boil, scraping up browned bits. Season with salt and pepper.
Return steak to pot, placing them over the vegetables. Cover, reduce heat to low, and simmer 1/2 hour.
Transfer steak to baking sheet or bowl. Continue to simmer sauce until thick, adding more stock if necessary, about another 45 minutes or so. Discard bay leaves and thyme sprig. Cut meat into 3/4- to 1-inch pieces then return meat to pot.
PICKLED CARAMELIZED ONIONS
Heat olive oil in large skillet over medium-high heat. Add onions, sprinkle with salt, and sauté until beginning to brown, stirring frequently, about 10 minutes. Add vinegar and sugar and cook until almost all vinegar is absorbed, about 1 minute. Season with salt and pepper. Transfer to bowl; cool.
ASSEMBLY
Butter your bread slices on each side. Divide meat among four slices. Add cheese, then top with onions. Finish with some romaine, and top with extra bread slice, buttered side out.
Heat griddle to medium heat. Grill sandwiches until bread is golden brown and cheese melts, about 3 minutes per side.
Transfer to work surface. Cut each in half on diagonal. Transfer to plates and serve.


To make it a real treat, serve with fries.


We had this on Friday night and it was perfect with a bit of the leftover wine. I'm really looking forward to making this again, though I think next time I'll try the actual short-ribs from the original recipe. I need a cast iron dutch oven though. I've been looking through the Pioneer Woman website and several ladies have mentioned that her shortribs are delicious, but I really want one of those 5L dutch ovens. I notice that she has a Le Creuset, but it's a little out of our price range right now, so we were looking at the KitchenAid one. Unfortunately a few people have complained about the quality, leaving us to save up for the one I really want.
Almost makes me drool as much as this sandwich. Almost.
Udon Soup
I know I've been MIA, many apologies. My kid and Mr. Man were flu-ey for a week and it was enough to keep them alive and myself uncontaminated. I do have a few recipes to post however, since I've been okay to both cook and eat!
So I bought the Bon Appetit magazine because of the delicious looking grilled sandwich on the cover (we'll get to that later) and found this recipe for Udon Soup. I thought it would be perfect since Mr. Man and Little Man needed something clear and healthful to regain strength.
You know, just because it's in Bon Appetit, doesn't mean it's good. Also, why buy the magazine when they post all the recipes on their site? Seriously, I could have spent that $7 on something delicious! Another plus of recipes on their site is that I can copy and paste rather than typing it all out myself. Woot for websites!
I don't even have any photos of the end result because it was such a bust. The yams weren't cooked enough, the cabbage was too thick, the noodles were all pasty. The plus side though is that the mushroom broth is freaking delicious! I've frozen a bunch of it and will definitely be making more when it runs out. It was full-flavoured and dark and rich, but not too. Really great broth.
Side notes: Have you ever noticed how much cheaper it is to shop in the "ethnic" aisle of the grocery store? Can't believe it! I cut my costs in half because I went down there looking for kombu. Don't buy the little packages of dried mushrooms in the produce section above the button and cremini mushrooms, go to the ethnic aisle and they have huge bags of the exact same thing for the same price as the 150g ones! Crazy!
So I bought the Bon Appetit magazine because of the delicious looking grilled sandwich on the cover (we'll get to that later) and found this recipe for Udon Soup. I thought it would be perfect since Mr. Man and Little Man needed something clear and healthful to regain strength.
You know, just because it's in Bon Appetit, doesn't mean it's good. Also, why buy the magazine when they post all the recipes on their site? Seriously, I could have spent that $7 on something delicious! Another plus of recipes on their site is that I can copy and paste rather than typing it all out myself. Woot for websites!
Udon with Mushroom Broth, Cabbage, and Yams
4 TO 6 SERVINGS
Recipe by Anna Thomas
Ingredients:
BROTH
10 cups Light Vegetable Broth (see recipe) or good-quality canned vegetable broth (such as Swanson) (I used regular veggie broth cubes)
3 cups water
1 1/2 cups coarsely chopped fresh cilantro (I only had some frozen stuff)
1 1/2 ounces dried shiitake mushrooms, rinsed
3/4 cup thinly sliced peeled fresh ginger (I think I only had about a 1/2 cup)
2 lemongrass stalks, outer dark layers removed, all but bottom 4 inches cut off and discarded
2 6-inch strips dried kombu (I used sushi seaweed since I couldn't find kombu)
2 teaspoons tamari soy sauce
1 teaspoon unseasoned rice vinegar (omitted)
GARNISHES
2 cups 1/2-inch cubes peeled yams (red-skinned sweet potatoes)
5 ounces snow peas, trimmed
4 cups 1/2-inch-wide crosswise slices cored Napa cabbage (I used red cabbage, slice it VERY thinly, a 1/2-inch-wide is too wide)
5 ounces slender carrots (preferably assorted colors), peeled, thinly sliced on diagonal
10 ounces Japanese-style udon noodles or soba noodles (I used rice noodles)
1 cup sliced green onions
1/4 cup matchstick-size strips peeled fresh ginger
4 to 6 ounces semi-firm tofu, cut into 1/2-inch cubes (optional)
Sambal oelek
Tamari soy sauce
Before we get on to the directions, I think the biggest issue with this soup was that I couldn't find the proper noodles or seaweed. Usually recipes are adaptable so I didn't worry about my substitutions, but maybe this is one of those soups that really requires the specific ingredients listed.
Directions:
BROTH
Bring broth and 3 cups water to simmer in large pot over medium heat. Add cilantro, mushrooms, sliced ginger, and lemongrass. Cover; simmer until mushrooms are tender, about 30 minutes. Rinse kombu; add to broth. Simmer 1 minute. Using tongs, remove kombu and mushrooms; discard kombu. Transfer mushrooms to work surface; cut off stems and discard. Cut each mushroom into 3 to 4 strips. Strain broth through fine-mesh strainer into another large pot; discard solids in strainer. Add tamari and rice vinegar to broth.
DO AHEAD Can be made 1 day ahead. Cover and chill mushrooms. Cool, cover, and chill broth.
GARNISHES
Bring large pot of salted water to boil. Cook yams until just tender, 4 to 5 minutes. Using skimmer, transfer to medium bowl. Cook snow peas, cabbage, and carrots separately until crisp-tender (snow peas, 30 seconds; cabbage, 1 1/2 minutes; carrots, 2 minutes). Using kimmer, transfer vegetables to separate bowls. Reserve cooking liquid.
DO AHEAD Vegetables can be cooked 2 hours ahead. Let vegetables and liquid stand at room temperature.
Bring cooking liquid to boil. Sprinkle with salt. Add noodles; cook until tender but still firm to bite, stirring often. Drain; rinse.
Meanwhile, bring vegetable broth to simmer. Add green onions and ginger strips. Season with salt and pepper.
Using tongs, divide noodles among bowls. Divide mushrooms, yams, snow peas, cabbage, and carrots among bowls, each in separate mound. Divide tofu, if using, among bowls. Ladle broth over and serve, passing sambal oelek and tamari separately.


I don't even have any photos of the end result because it was such a bust. The yams weren't cooked enough, the cabbage was too thick, the noodles were all pasty. The plus side though is that the mushroom broth is freaking delicious! I've frozen a bunch of it and will definitely be making more when it runs out. It was full-flavoured and dark and rich, but not too. Really great broth.
Side notes: Have you ever noticed how much cheaper it is to shop in the "ethnic" aisle of the grocery store? Can't believe it! I cut my costs in half because I went down there looking for kombu. Don't buy the little packages of dried mushrooms in the produce section above the button and cremini mushrooms, go to the ethnic aisle and they have huge bags of the exact same thing for the same price as the 150g ones! Crazy!
Thursday, February 4, 2010
The Big Enchilada
Someone mentioned a taco bar today as an option for a buffet, followed closely by someone mentioning a chili bar, and I drooled over the thought of them put together. I wasn't feeling ambitious enough though, so I'm making enchiladas instead.
My mom had a rotating list of suppers that were acceptable to everyone in the family. They were posted on the side of the fridge and once in a while, when we were lucky, we got to pick one that we wanted. I varied between macaroni and cheese, shake-n-bake chicken and enchiladas. She would make the tortillas from scratch on her cast iron grill, then roll them up over crazy amounts of cheese, then bake with tomato sauce. It wasn't fancy, but it was so filling and comforting and tasty.
I only had mozza cheese instead of cheddar, but it didn't really matter. Cheese was cheese at that point.
For starters, make your tortillas.
Cornmeal Tortillas
Ingredients:
1/2 c. cornmeal
1 c. all-purpose flour
1 egg
1 1/2 c. water
1/2 tsp. salt
Olive oil
Directions:
Whisk all ingredients together until they form a uniform batter.

Heat a bit of oil in a heavy bottomed skillet over medium-high heat. Once hot, quickly re-whisk your batter for a couple of seconds to distribute the cornmeal, then pour about three inches worth (diameter) into your pan. Swirl the batter to make a thin tortilla. Cook until golden then flip, about 2-3 minutes depending on your heat.

Cook evenly on both sides, then remove to a warm plate in the oven. I just used my toaster oven set at "Keep Warm".
You can use these for all sorts of things, and they freeze really well too.
Enchiladas
Ingredients:
about a 1/3 - 1/2 brick of cheese, usually cheddar, grated
1 lb. ground beef (I used lean)
1 small onion, chopped
2 tsp. taco seasoning
Olive Oil
A jar of tomato sauce (or your own which would be even better! It should be pasty.)
Directions:
Heat a bit of oil, then sauté your onion and beef until just cooked through. Add your seasoning and mix well. Remove from heat.

(Oops! Forgot a photo after it was done!)
Pre-heat your oven to 375F, and lightly grease a deep baking dish.

Put a reasonable amount of meat and cheese mixture in each tortilla, then wrap and place seam side down in your baking dish. Snug them in together nice and close. After your bottom layer is done, pour about a cup of the tomato sauce over top. Finish your second layer of wraps.
Smother with tomato sauce, then top with any extra cheese.

Bake, uncovered, for about 35 minutes or until cheese is melted and the sauce is bubbling.

Serve with a salad so you don't feel so bad for the heart attack in a pan that you've brought to the table. Total cheesy goodness comfort food, perfect for February weather.
Subscribe to:
Comments (Atom)

